modules
Git: Branching
Why branches?
When using Git, branches are a part of your everyday development process. Git branches are effectively a pointer to a snapshot of your changes. When you want to add a new feature or fix a bug—no matter how big or how small—you spawn a new branch to encapsulate your changes. This makes it harder for unstable code to get merged into the main code base, and it gives you the chance to clean up your future’s history before merging it into the main branch.
There are many different use cases for branches ranging from the aforementioned “feature branches”, “release branches”, dev/test/qa branches, and more.
How do branches work?
When creating a new repository, git by default starts with a master branch which is what we have been using until now. When we create branches, we are branching off of the most recent commit on the master branch.
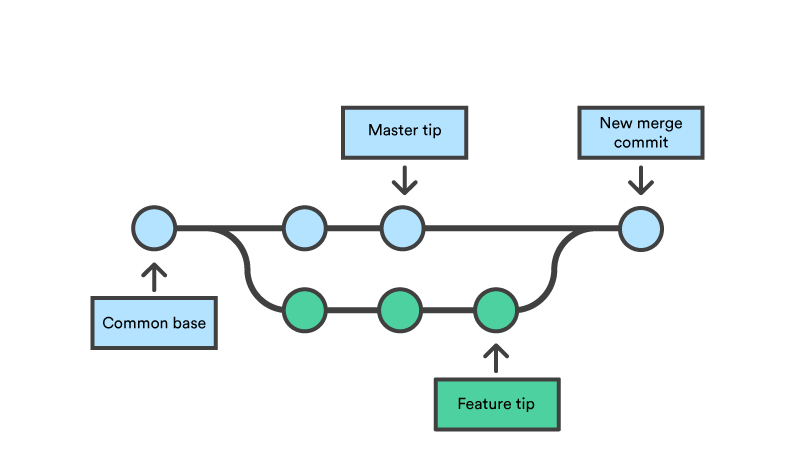
The diagram above visualizes a repository with two isolated lines of development, one for a little feature, and one for a longer-running feature. By developing them in branches, it’s not only possible to work on both of them in parallel, but it also keeps the main master branch free from questionable code.
After developing a feature, it needs to be merged back into the master branch. We will do this using a Pull Request.
How does merging work?

When creating a branch, the head of the branch splits off of a common base as seen in the picture above. This is why we refer to Git as a non-linear workflow. There are three new commits on the feature branch and 2 new commits directly on the master branch.

When come time to merge, the difference between the 2 new commits on the master branch and the new code in the feature branch is resolved in what is referred to as a merge commit. Git tries to be as smart as possible when merging code but occasionally there are changes that cannot automatically be merged. This is when we run into a merge conflict. We will talk more about this in detail.
Sources:
- https://www.atlassian.com/git/tutorials/using-branches
- https://www.atlassian.com/git/tutorials/using-branches/git-merge
Pull Requests
While there are other ways to merge branches, we will be using pull requests. When using the shared repository model (one repository, multiple collaborators),
- base: almost always the
mainbranch. this is where you are merging on to - compare: this is your feature branch. this is where you are merging from
In this screenshot, I am creating a Pull Request from the instructor-config-file branch (compare) to the main branch (base). Note that this pull request has 1 commit.
Commands
List Branches
git branch
Create (and switch to) a new branch
The -b flag creates a new branch.
git checkout -b <branchname>
Switch branch
git checkout <branchname>
➡️ Try It
-
Get into your teams.
- The product owner should:
- create a repository under the
code4policyaccount nameddemo-website(or use your project website!) - add the remaining team members (and the prof and the TA) as collaborators to the repo. this is done under the repo settings
- enable github pages on this repo with the
masterbranch as the source
- create a repository under the
-
The product owner should create an
index.htmland a page calledour-team/index.html. Commit and push this change directly to themasterbranch.Here is a sample
index.html:<!DOCTYPE html> <html> <head> <title>Demo Website</title> </head> <body> <h1>Our Demonstration Website</h1> <a href='our-team/index.html'>Learn more about our team</a> </body> </html>Here is a sample
our-team/index.html:<!DOCTYPE html> <html> <head> <title>Demo Website</title> </head> <body> <h1>About Us!</h1> </body> </html> -
Everyone should clone the repository.
git clone git@github.com:XXXXX/demo-website.git - All team members, should create branches titled
add-member-<name>. For example, I would do:
git checkout -b add-member-dhrumil
- In this branch, each team member should edit
our-team/index.htmland add some basic information about yourself to this page. Be sure to only create this one file - there should be no other changes to the repository. It’s important to keep your code changes isolated when working with git to avoid unecessary merge conflicts.- Each member should:
- commit this change to the branch
- push it
- create a pull request
- Product owner should review and merge all of the PRs. There should be no conflicts.
- Each member should:
- All team members should checkout the master branch and pull the latest code.
Deleting a branch locally
git branch -d <branchname>